Step-by-Step: Configuring Remote Syslog for Your vSphere Environment
Logging is a crucial aspect of maintaining a healthy vSphere environment. Centralizing logs from vCenter and ESXi hosts on a remote syslog server can streamline monitoring and troubleshooting tasks. In this guide, we will walk you through the process of configuring remote syslog for your vSphere setup using Ubuntu as the syslog server and rsyslog as the syslog daemon.
Setup rsyslog in Ubuntu
- Install rsyslog - First, ensure that rsyslog is installed on your Ubuntu server. You can install it using the following command:
```bashsudo apt-get install rsyslog
1
2
3
4
5

- **Start and Enable rsyslog** - Start and enable the rsyslog service to ensure it runs at boot:

```bashsudo systemctl start rsyslog
sudo systemctl enable rsyslog
Configuring the rsyslog Configuration
- Edit the rsyslog Configuration File - Open the rsyslog configuration file in a text editor:
```bashsudo nano /etc/rsyslog.conf
1
2
3

- **Configure rsyslog to Accept Remote Logs** - Uncomment or add the following lines to allow rsyslog to receive remote logs:
Provides UDP syslog reception
$ModLoad imudp $UDPServerRun 514
Provides TCP syslog reception
$ModLoad imtcp $InputTCPServerRun 514
1
2
3

- **Configure rsyslog Template** - Add the following lines to the rsyslog configuration file to specify a custom template for incoming logs:
$template remote-incoming-logs,”/var/log/%HOSTNAME%/%PROGRAMNAME%.log” . ?remote-incoming-logs & ~
1
2
3
4

- **Save and Restart rsyslog** - Save the configuration file and restart rsyslog to apply the changes:

```bashsudo systemctl restart rsyslog
- Set Firewall Rule - Run the below command to set the firewall rule in Ubuntu for rsyslog
```bash sudo ufw allow 514/udp sudo ufw allow 514/tcp
1
2
3
4
5
6
7
8
9
10
11
12
13
14
15
16
17
18
19
20
21
22
23
24
25
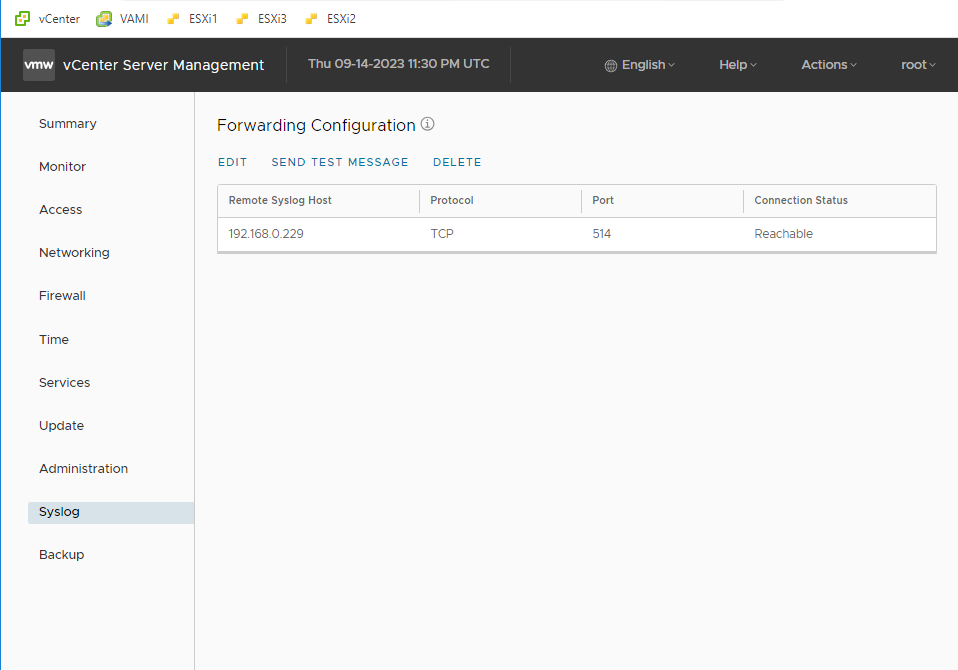
## Configure the Syslog for vCenter
- Log in to the VCSA management interface ([https://vcsa-ip-address:5480](https://vcsa-ip-address:5480/)).
- Navigate to "Configure" > "Advanced Settings."
- Search for the "Syslog" settings.
- Enter the IP address or hostname of the remote syslog server.
- Set the protocol (UDP or TCP) and port (default is 514) to match your rsyslog configuration.
- Click "Save Settings."
## Configure the Syslog for ESXi
Configuring syslog on your ESXi host is essential for centralized log management. In this guide, we will configure syslog for ESXi using the `esxcli` command-line tool. This method allows you to specify a remote syslog server and enable the necessary firewall rules for syslog traffic.
Please ensure that you have SSH access to your ESXi host before proceeding with these commands.
- **Set the Syslog Server** - Use the following `esxcli` command to set the syslog server to your desired remote syslog server address. Replace `192.168.0.229` with the IP address of your syslog server:
esxcli system syslog config set –loghost=udp://192.168.0.229:514
1
2
3
4
5

- This command configures the ESXi host to send syslog messages to the specified remote server using UDP on port 514.

- **Enable the Firewall Rules for Syslog** - To allow syslog traffic through the ESXi firewall, use the following `esxcli` commands:
esxcli network firewall ruleset set –ruleset-id=syslog –enabled=true esxcli network firewall refresh
1
2
3
4
5
6
7

- The first command enables the firewall ruleset named "syslog," allowing syslog traffic.

- The second command refreshes the firewall rules to apply the changes immediately.

- **Verify the Configuration** - You can verify the syslog configuration by checking the current settings using the `esxcli` command:
esxcli system syslog config get ```
Conclusion
You have successfully configured syslog for your ESXi host using esxcli commands. Syslog messages will now be sent to the specified remote syslog server, allowing you to centralize log management and enhance monitoring and troubleshooting capabilities in your virtual environment.